サイトにチャットボット設置
5. ファイルディレクトリの確認とインターフェース(HTML/CSS)作成
前章までで環境はすべて整いましたので、次はコーディングです。
ファイルディレクトリの確認
まずファイルのディレクトリを確認しておきましょう。
これにのっとってファイルを配置してください。
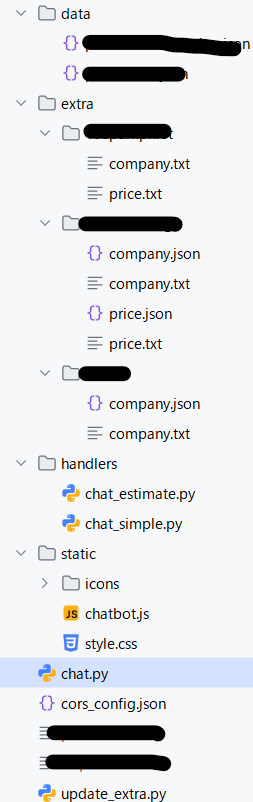
- chat.py:
OpenAIとWordPressサイトを繋ぐAPIメインプログラム。
設定に基づき、handlerディレクトリ内のアプリロジックのいずれかを起動する - handlerディレクトリ:
アプリロジック - cors_config.json:
各種設定情報 - staticディレクトリ:
cssやjsなど静的ファイル(会話のアイコンなども)が入ります。
chatbot.js がチャットボットの表示の制御およびAPIメインプログラムへのデータ送信を担当 - extraディレクトリ:
サイトごとのチャットボットに提供する情報源テキスト - dataディレクトリ:
今回不使用。別の事例でご紹介します。 - update_extra.py:
テキスト情報を生成するプログラム
チャットボットCSS
スタイルは自由に作りましょう。こちらにサンプルを置いておきます。
style.css
@charset "UTF-8";

/* ── メッセージ部分 ── */
.message {
  display: flex;
  align-items: flex-start;
  margin-bottom: 8px;
}
.message.user {
  flex-direction: row-reverse;
}
.message.bot {
  justify-content: flex-start;
}
.avatar {
  width: 24px;
  height: 24px;
  border-radius: 50%;
  margin: 0 6px;
}
.text {
  max-width: 80%;
  padding: 6px 10px;
  border-radius: 12px;
  font-size: 13px;
  line-height: 1.6;
  white-space: pre-wrap;
  word-break: break-word;
}
.user .text { background-color: #dcf8c6; }
.bot  .text { background-color: #f1f0f0; }

/* ── チャットボット全体 ── */
#chatbot {
  position: fixed;
  bottom: 0;
  right: 0;
  width: 320px;
  border: 1px solid #ccc;
  background-color: white;
  z-index: 10000;
  padding-bottom: 10px;
  transition: height 0.3s ease;
  overflow: hidden;
}
/* 折りたたみ時(ヘッダーだけ表示) */
#chatbot.collapsed {
  height: 62px;  /* ヘッダー高さに合わせる */
}
/* 展開時(画面いっぱいに) */
#chatbot.expanded {
  height: 100vh; /* ビューポート全高 */
}

/* ── ヘッダー ── */
#chatbot-header {
  background-color: #007bff;
  color: #fff;
  padding: 5px 10px;
  cursor: pointer;
  font-size: 13px;
  line-height: 2;
}

/* ── メッセージ表示領域 ── */
#chatbot-messages {
  height: calc(100% - 100px); /* ヘッダー+入力欄を除いた高さ */
  overflow-y: scroll;
  padding: 10px;
}

/* ── 入力欄 ── */
#chatbot-input {
  width: 100%;
  box-sizing: border-box;
  border: none;
  border-top: 1px solid #ddd;
  padding: 8px;
  font-size: 13px;
}
#chatbot-input:focus {
  outline: none;
}
チャットボットアイコン
会話する人のアイコンはstatic/iconsディレクトリに以下の名称で格納してください。
ユーザーアイコン: user.svg
ボットアイコン: support.svg
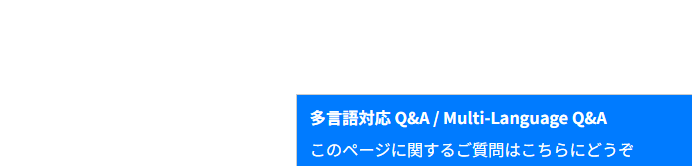
チャットボットHTML
次にチャットボット部のHTMLを用意します。
なお、このHTMLはチャットボットAPIサーバー側でなく、チャットボットを表示するページ側のHTMLの任意の箇所に記述します。
<div id="chatbot" class="collapsed">
<div id="chatbot-header">
<strong>多言語対応 Q&A / Multi-Language Q&A</strong><br>
このページに関するご質問はこちらにどうぞ
</div>
<div id="chatbot-messages"></div>
<input
type="text"
id="chatbot-input"
placeholder="質問を入力してください / Ask your question..."
aria-label="チャット入力欄 / Chat input"
>
</div>
これで右下にこんなチャットボットのブロックが現れることになります。
(現状ではチャットボットAPIサーバー側のCSSを参照してない状態なのでまだ現れません。)
次はこれを制御するjavascriptについて。