AI の生成記事をWordPressサイトに直接自動投稿する
5. ファイルディレクトリの確認と記事生成フォームの構築
前章までで環境はすべて整いましたので、次はコーディングです。
ファイルディレクトリの確認
まずファイルのディレクトリを確認しておきましょう。
これにのっとってファイルを配置してください。
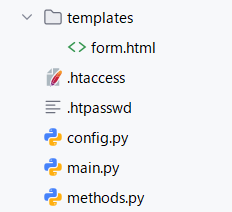
- main.py:
OpenAIとWordPressサイトを繋ぐAPIメインプログラム - methods.py:
関数群 - config.py:
各種設定情報 - templates/form.html
記事生成フォーム - .htaccess, .htpasswd
ベーシック認証やさくらインターネットでPythonを使用するための設定
.htaccess
さくらインターネットでは、Pythonを動かすための設定が必要です。
また、自動投稿フォームにアクセスするための認証として、最低限ベーシック認証も設定しておきましょう。
(.htpasswdファイルは紹介しませんが、一般的なID/パスワードファイルです。ご自身でご用意ください)
.htaccess
Options +ExecCGI
AddHandler cgi-script .py
DirectoryIndex main.py

AuthUserFile /home/XXXX/www/XXXXX/.htpasswd
AuthGroupFile /dev/null
AuthName "Input ID and Password."
AuthType Basic
require valid-user
<Files ~ "^.(htpasswd|htaccess)$">
deny from all
</Files>
記事生成フォーム(templates/form.html)
HTMLサンプルを置いておきます。
テーマは10件まで登録できるようになっています。派生記事の場合だけターゲットページURLの入力欄が出ます。
<!DOCTYPE html>
<html lang="ja">
<head>
  <meta charset="UTF-8">
  <title>AI記事投稿フォーム</title>
  <style>
    body { font-family: sans-serif; padding: 2rem; }
    label { display: block; margin-top: 1rem; }
    textarea, input[type="text"] { width: 100%; padding: 0.5rem; margin-top: 0.2rem; }
    .theme { margin-bottom: 0.5rem; }
  </style>
</head>
<body>
<h1>AI記事投稿フォーム</h1>
<form method="POST" action="/" enctype="multipart/form-data">
  <label>投稿タイプ:</label>
  <label><input type="radio" name="type" value="new_post" checked> 新規記事:テーマに沿って新しい記事を生成</label>
  <label><input type="radio" name="type" value="mass"> 派生記事:ターゲットページの内容を基に、テーマに沿って派生記事を生成</label>

  <div id="themesArea">
    <label>テーマ(最大10件):</label>
    <div id="themeInputs">
      <input class="theme" type="text" name="theme" placeholder="テーマ1">
    </div>
    <button type="button" onclick="addTheme()">+ テーマ追加</button>
  </div>

  <div id="urlArea" style="display:none;">
    <label>ターゲットページURL:</label>
    <input type="text" name="target_url" id="targetUrl">
  </div>

  <div id="catArea">
    <label>投稿カテゴリスラッグ(1つだけ):</label>
    <input type="text" name="category_slug" placeholder="例: column">
  </div>

  <div id="tmplArea">
    <label>HTMLテンプレート:</label>
    <textarea name="template_html" id="templateHtml" rows="10"
              placeholder="ここにテンプレHTMLを貼り付けてください"></textarea>
  </div>
  <br><br>
  <button type="submit">実行する</button>
</form>

<script>
  const radios = document.querySelectorAll("input[name='type']");
  const themeInputs = document.getElementById("themeInputs");
  const urlArea = document.getElementById("urlArea");
  const themesArea = document.getElementById("themesArea");
  const catArea = document.getElementById("catArea");
  const tmplArea = document.getElementById("tmplArea");

  radios.forEach(r => r.addEventListener("change", () => {
    const type = document.querySelector("input[name='type']:checked").value;
    urlArea.style.display = (type === "mass") ? "block" : "none";
    themesArea.style.display = (type === "new_post" || type === "mass") ? "block" : "none";
    catArea.style.display = (type === "new_post" || type === "mass") ? "block" : "none";
    tmplArea.style.display = (type === "new_post" || type === "mass") ? "block" : "none";
  }));

  function addTheme() {
    if (themeInputs.children.length >= 10) return;
    const input = document.createElement("input");
    input.type = "text";
    input.name = "theme";
    input.className = "theme";
    input.placeholder = `テーマ${themeInputs.children.length + 1}`;
    themeInputs.appendChild(input);
  }

  document.querySelector("form").addEventListener("submit", function (e) {
    const type = document.querySelector("input[name='type']:checked").value;
    const themes = [...document.querySelectorAll("input[name='theme']")].map(i => i.value.trim()).filter(v => v);
    const url = document.getElementById("targetUrl").value.trim();
    const tmpl = document.getElementById("templateHtml").value.trim();

    // バリデーションチェック
    if ((type === "mass" || type === "new_post") && !tmpl) {
      alert("テンプレートHTMLを入力してください。");
      e.preventDefault();
      return;
    }
    if ((type === "mass") && !url) {
      alert("派生の場合はターゲットURLが必要です。");
      e.preventDefault();
      return;
    }
    if ((type === "mass" || type === "new_post") && themes.length === 0) {
      alert("テーマを1件以上入力してください。");
      e.preventDefault();
      return;
    }
  });
</script>

</body>
</html>
formタグのactionはトップに設定してください。
さくらインターネットで action にトップページ以外を設定するには、少し面倒な手順が必要になるので、今回は簡易にいきます。
action="/"
次はいよいよ、このフォームの内容を受け取ってAIとやり取りする本体プログラムです。